Worksheets

Tuesday, October 26, 2010

How to use Format as Table?

The presentation or the look of the spreadsheet is a very important factor to be considered. Using aesthetic colors and proper borders enrich the spreadsheet. Creating tables is one of the most popular methods of presenting data. In Excel there are a wide variety of options from which you could create good tables. But if You are in a hurry the best option you could use is the "Format as Table" option.


Format as table option is one of the most easiest ways of creating tables. The button can be found in the mid section of the ribbon under the Home tab.


When you click on the button a menu appears displaying a huge variety of colors that you can pick from, for creating a table.


When you select a particular color a dialog box appears. Select the range of cells on which you want the table to be formatted.


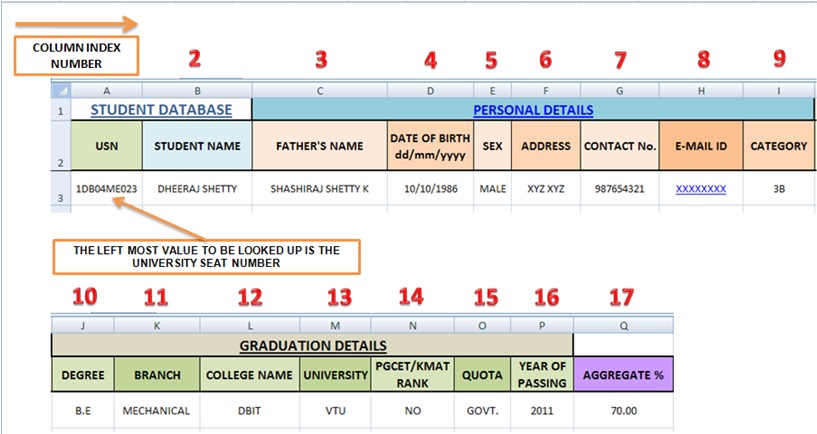
Now that you have your table created! Click anywhere on the table. A new tab called the Table tools will get highlighted on the ribbon.


You could change the style of the table by selecting from Table Styles menu.


The header row is used for classifying the columns, They come along with data filter. Un-check the Header Row if you do not need them.
You could include a row for totalling the values entered in the table. Now this Total Row option is truly versatile.You could carry out mathematical functions such as Sum, Average, Standard Deviation, Count ( Number of values entered in a column) Max (Maximum value in a column) Min (Minimum value in a column) so on.


Remove duplicates are used to remove repetitive values from a column.


Suppose you want to remove the Format Table link form the created table you could select "Convert to range". It will remove the data filter and the Format table link. This will turn out to be a simple table on range of cells.


Try other designs! Play with all the colors!

Friday, October 22, 2010

How to use VLOOKUP formula?


In Excel, the VLOOKUP formula searches for value in the left-most column of table_array and returns the value in the same row based on the index.
Didn't get it eh?
Consider a student database of a particular class in an engineering college.
The placement officer has requested the students to enter their details across rows under specified columns.
The student have entered their university seat numbers in the first column and subsequent data in other.
Say there were 100 students in the class. If each of the student has made an entry of data, then the excel sheet would turn out to be one huge pile of data.
The placement officer would have a tough time in segregating data. Now wouldn't it be easy if he could generate data in the form of a table for a particular student. These is where VLOOKUP comes to help. The syntax for VLOOKUP is:


What is a lookup_value?
It is a key for finding other data, In this example I use the University seat number as a lookup_value

What is a table_array?
It is the entire range of cells that contain the data

What is a column index number?
See snapshot shown below

Range_Lookup?
It should be FALSE for an exact match and TRUE for an approximate match.


Now that we have understood the syntax we will apply the VLOOKUP
I have created a Lookup worksheet containing a organized table for the data to be retrieved. In each of the specified cells I enter formulas as shown.


Interpretation of the formula beside student name.
=VLOOKUP($C$2,DATABASE!$A$3:$T2000,2,FALSE)
It says if C2 contains a university seat number, then retrieve data from the second column of table range A3:A2000 from the DATABASE worksheet by looking up the number in the left most column.


Now when I enter the university seat number in cell C2, we get!!

Try entering many such data into the database sheet and check with the Lookup sheet.
Write your comments!


Tuesday, October 19, 2010

Copy, Paste, Paste Special

1. Keyboard shortcut to copy is Ctrl+C. Else you can right click on a particular cell and select copy. Or you could select the cell and then click on the copy button.


2. The normal paste option pastes the copied data as it is. You could copy data from a single cell and paste it on a large range of cells including rows, columns etc. Keyboard shortcut for paste is Ctrl+V. Else you can right click on a cell range and select paste. Or you can select the paste button


3. The unique option in excel is the paste special option. I have created a simple table to demonstrate how paste special works. Please see the below snapshot.

4. So we have created a calculator which is working just fine. Now  you want to create another such table, But going over the entire formatting thing is a problem.Also you wouldn't want the same text as that of the previous table.
5. Now select the entire table you had created. Select Copy.


6. Select any other cell on the worksheet and right click and choose paste special. The Paste special dialog box opens, the default options in it will be 'All' in Paste and 'None' in operation. The following actions takeplace when each of the option is clicked.


a) Formulas: The colour and number formatting will not be copied, But the formula contained in cell C6 will be copied and updated to the corresponding cell index where the data is pasted.


b) Values: This option pastes only values from the range that has been copied. It will not paste any other formatting from the copied range.
c) Formats: Pastes all types of formatting from one range to another except for column and row widths.


d) Comments: Pastes only comments from one cell to another.
e) Data Validation: Copies data validation types such as drop down lists and restricted cell 
     entries. How to create a drop down list using data validation?
 f) Transpose: How to rearrange data across rows to columns?

You could try the other options in the paste special dialog box for yourself! Excel is all about exploring!

Saturday, October 16, 2010

How to edit contents of a drop down list using name manager?

I have already shown creating a drop down list using data validation in  the previous post.
How to create a drop down list using data validation?
In this post I will discuss how to edit contents of drop down list.
As I had said before, we identify data ranges that are used to create a list by a specific name.
In the previous post I had provided two specific names for the data i.e COURSE and COMBINATION.
There were 3 entries under COURSE and 7 entries under COMBINATION.
Suppose you want to edit contents of each list then follow the below mentioned steps.
1. Enter the extra entries into the respective columns in the REFERENCE sheet.

2. Select Name Manager under the Formulas Tab.

3. You can see two names listed in the dialog box i.e COURSE and COMBINATION

4. Click on COMBINATION. The range referenced by this name will be automatically highlighted.

5. Click in the refers to text box and then change the value of $C$8 to $C$10. The two entries 
    "MECHANICAL" and "ELECTRICAL" will be included in the COMBINATION list. 
6. Select OK.
7. Follow the same steps for COURSE.


Thursday, October 14, 2010

How to rearrange data across rows to columns?

1. Select the group of cells across the row containing data

 2. Right Click on the selection and choose copy.

 3. Select any cell on the workbook, then right click and choose paste special.


4.  In the Paste Special Dialog Box choose Transpose and click OK.
5. The same method can be used to rearrange data across columns to rows. 

Wednesday, October 13, 2010

How to create a drop down list using data validation?


1. Data Validation option is used in creating drop down lists
For example: Various Departments in office, Different Courses in a college etc
(Data validation is the process of ensuring that a program operates on clean, correct and useful data.)

2. Data Validation lists the data from a source on the same worksheet or another worksheet in the same
workbook. The source is basically a column  of cells containing data.

3. The steps are as follows
a) Highlight the locations where you want the list to appear in the worksheet. (in example> COURSE LIST)
b) Enter the required data in another worksheet (in example> REFERENCE)


c) In this method the different lists are identified by the different names provided to their ranges. 
    Select cells from A2 to A4 in REFERENCE worksheet by dragging the mouse with the left 
     button clicked.  
    Then click on the name box and enter the word COURSE in it and press enter. Follow the  
    same step for COMBINATION.

d) Now go back to the COURSE LIST sheet and select cell B2. Select Data validation command under the data tab. 
e) In the data validation dialog box under allow choose list.
f) In the Source box enter = sign and then the name COURSE and press enter.
g) A list will be created in Cell B2 for the courses offered in college. Follow the same steps to create a list for COMBINATION.


How to rename a worksheet?

1. When a new excel workbook is opened we generally find 3 worksheets as default i.e Sheet1,  
    Sheet2 and Sheet3
2. Select one of the sheet and right click.
3. Select Rename
4. Enter the desired name and press enter.

Saturday, October 9, 2010

How to format columns and rows in Excel 2007?

Formatting Row Height
  1. Select the row index number which needs to be formatted. Excel provides a maximum of 65,536 rows.
  2. Right click and select Row Height from the pop up menu.
  3. Enter the required height. Excel limits the height of rows between 0 and 409 points.
  4. When the row height is 0 it appears to be hidden.

Formatting Column Width
  1. Select the column index number which needs to be formatted. Excel provides a maximum of 256 columns.
  2. Right click and select Column Width from the pop up menu.
  3. Enter the required width. Excel limits the width of rows between 0 and 255 characters
  4. When the column height is 0 it appears to be hidden.